DIY Lean-To Shed: Simple Plans for a Beautiful Outdoor Build
Constructing a lean-to shed offers a rewarding blend of practicality and aesthetic appeal. This guide provides comprehensive plans for building a beautiful and functional lean-to shed, suitable for novice DIY enthusiasts. We will cover everything from initial planning and material selection to construction techniques and finishing touches, ensuring a successful and enjoyable project.
Phase 1: Planning and Design
Before commencing construction, meticulous planning is paramount. This phase involves determining the shed's dimensions, location, and desired features. Careful consideration of these factors will significantly impact the project's success and longevity.
Determining Dimensions and Location
The dimensions of your lean-to shed will be primarily dictated by its intended purpose and available space. Consider the items you plan to store; a larger shed will accommodate more, but it will also require more materials and labor. Careful measurement of the available area against your desired shed size is crucial to ensure a proper fit against the existing structure (e.g., house, garage, fence). Ensure sufficient clearance is left for access and maneuverability around the completed shed.
Choosing Materials
Material selection impacts both the aesthetics and durability of your shed. Pressure-treated lumber is highly recommended for its resistance to rot and insect infestation. Consider using cedar or redwood for a more aesthetically pleasing, naturally rot-resistant option, though it comes at a higher cost. For roofing, asphalt shingles provide a cost-effective and readily available solution. Metal roofing offers superior longevity and weather resistance but requires more specialized installation techniques. Consider the local climate and your budget when selecting materials.
Essential Tools and Equipment
Prior to commencing construction, gather all necessary tools and equipment. This will ensure a smooth and efficient workflow. Essential tools include:
- Measuring tape
- Level
- Shovel
- Post-hole digger (or auger)
- Circular saw
- Drill with assorted drill bits
- Hammer
- Safety glasses
- Work gloves
- Screwdriver (both Phillips and flathead)
- Safety harness and fall protection (if working at heights)
The specific tools required may vary slightly depending on the chosen materials and design. Ensure you have all necessary tools before commencing construction to avoid delays.
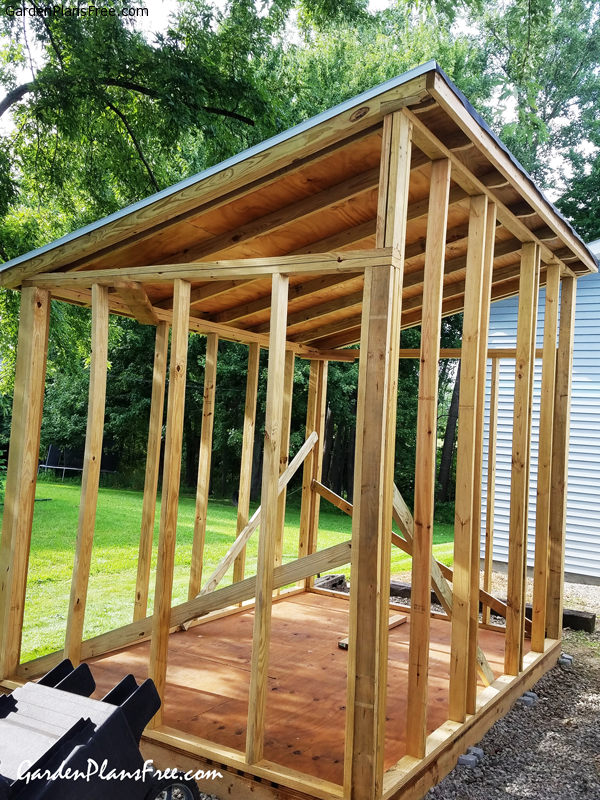
Phase 2: Foundation and Framing
The foundation and framing form the structural backbone of your lean-to shed. A robust and well-constructed foundation and frame will ensure the longevity and stability of your structure.
Preparing the Foundation
The foundation for your lean-to shed should be level and adequately sized to support the structure. For a smaller lean-to, a simple gravel base may suffice. For larger structures, a concrete slab or concrete piers may be necessary. Ensure the ground is properly leveled and compacted before pouring concrete. If using piers, ensure they are set deep enough to provide adequate support and are properly spaced.
Framing the Walls and Roof
The framing process involves constructing the walls and roof structure. Begin by cutting the lumber to the appropriate dimensions based on your pre-determined plans. Use pressure-treated lumber for all framing members to ensure durability. Construct the wall frames, ensuring they are square and plumb. For the roof, construct rafters according to your desired roof pitch. Securely fasten all framing members using appropriate nails or screws.
Consider using a level and a square to ensure accuracy throughout the framing process. Precise cuts and proper alignment are essential for a stable and aesthetically pleasing structure. The lean-to structure should be well-anchored to the supporting wall or structure. Consider using appropriate connectors and fasteners to create a strong and durable bond.
Phase 3: Roofing and Siding
Once the framing is complete, the roofing and siding can be installed. These elements provide weather protection and enhance the shed's aesthetic appeal.
Installing the Roofing
Begin by installing underlayment on the roof rafters to provide a water-resistant barrier. This will protect the structure from moisture damage. Then, install the chosen roofing material according to the manufacturer’s instructions. Ensure proper overlap between shingles or metal sheets to prevent leaks. For asphalt shingles, follow the manufacturer's recommendations for nail spacing and shingle placement.
Installing the Siding
After completing the roofing, install the siding. This can be accomplished using a variety of materials, including wood, vinyl, or metal siding. Ensure proper overlapping of siding materials to prevent water penetration. Properly securing the siding to the framing is crucial to ensure structural integrity and weather protection. Remember to leave space for ventilation to prevent moisture buildup.
Phase 4: Finishing Touches and Safety Considerations
Once the main construction is complete, adding finishing touches will enhance both the functionality and aesthetic appeal of your lean-to shed. Prioritizing safety throughout the entire process is paramount.
Adding Finishing Touches
Consider adding a door and windows to your lean-to shed for easy access and natural light. Paint or stain the exterior to enhance its appearance and protect the wood from the elements. Adding shelves or other interior features will increase storage capacity. Consider incorporating weather stripping around doors and windows to enhance weather resistance.
Safety Precautions
Safety is paramount throughout the entire construction process. Always wear appropriate safety equipment, including safety glasses, work gloves, and a dust mask. When working at heights, use a safety harness and fall protection system. Ensure proper ventilation when working with paints, stains, or other chemicals. Follow all manufacturer’s instructions for the use of tools and materials. Never work alone on a construction project; always have a helper available.
Building a lean-to shed is a rewarding project that can enhance the functionality and aesthetic appeal of your property. By following these detailed plans and prioritizing safety, you can successfully create a beautiful and durable outdoor structure.
0 comments:
Post a Comment
Note: Only a member of this blog may post a comment.