Build Your Dream 8x12 Lean-To Storage Shed: A Step-by-Step Guide
Hey there, folks! So, you're thinking about building a lean-to shed? Smart move! They’re super practical, relatively inexpensive to build, and can really add value to your property. This guide will walk you through building an 8x12 lean-to shed â€" perfect for storing garden tools, bikes, or whatever else you need to keep dry and safe. Let’s get started!Planning and Preparation: The Foundation of a Great Shed
Before you even think about grabbing a hammer, careful planning is key. This will save you headaches and potentially costly mistakes down the line.Choosing Your Location
Where will your new shed live? Consider proximity to your house (for easy access), sunlight (for good ventilation), and the existing landscape. Make sure you've got enough space for the 8x12 footprint, plus a little extra room for working around it. Check local building codes â€" you might need a permit depending on your location.
Gathering Your Materials
This is where a detailed list is your best friend. You'll need pressure-treated lumber for the foundation (to resist rot and pests), plywood for the walls and roof, roofing materials (shingles, metal, etc.), fasteners (nails, screws), and other hardware. Don't forget things like a spirit level, measuring tape, saw, hammer, and possibly a power drill.
Here's a rough list to get you started (quantities will vary based on your specific design and materials):
- Pressure-treated 4x4 posts for the foundation
- Pressure-treated 2x4s for framing
- Plywood sheets for walls and roof
- Roofing material of your choice (shingles, metal, etc.)
- Concrete mix (if you’re using a concrete base)
- Nails, screws, and other fasteners
- Exterior paint or stain (optional)
Leveling Your Site
A level base is crucial for a stable shed. Use a shovel and rake to clear the area of any debris, rocks, and uneven patches. You can create a level base using either compacted gravel or a concrete slab. If you opt for gravel, make sure it's well-compacted to prevent settling. A concrete slab provides a more solid and permanent foundation.
Building the Foundation: A Solid Start
With your site prepped, it's time to build the foundation. This will support the entire structure, so it needs to be sturdy and level.
Concrete Slab Foundation (Recommended)
If you choose a concrete slab, dig a shallow trench (about 4-6 inches deep) to the dimensions of your shed. Place a layer of gravel at the bottom for drainage. Then, install your formwork (temporary wooden walls) to contain the concrete. Mix your concrete according to the package instructions and pour it into the formwork, ensuring it’s level. Allow ample time for curing (usually a few days).
Gravel Base Foundation
For a gravel base, level the ground and add a layer of compacted gravel, about 4-6 inches deep. This provides a good base but isn't as solid as concrete.
Framing the Walls and Roof: The Structure Takes Shape
Now for the fun part â€" building the actual structure! This involves assembling the walls and roof framing.
Wall Framing
Cut your pressure-treated 2x4s to the correct lengths for the wall studs. Construct the walls using standard framing techniques, ensuring the studs are plumb (perfectly vertical). Use plywood sheathing to cover the framed walls. Remember to leave openings for a door and any windows you might want to include.
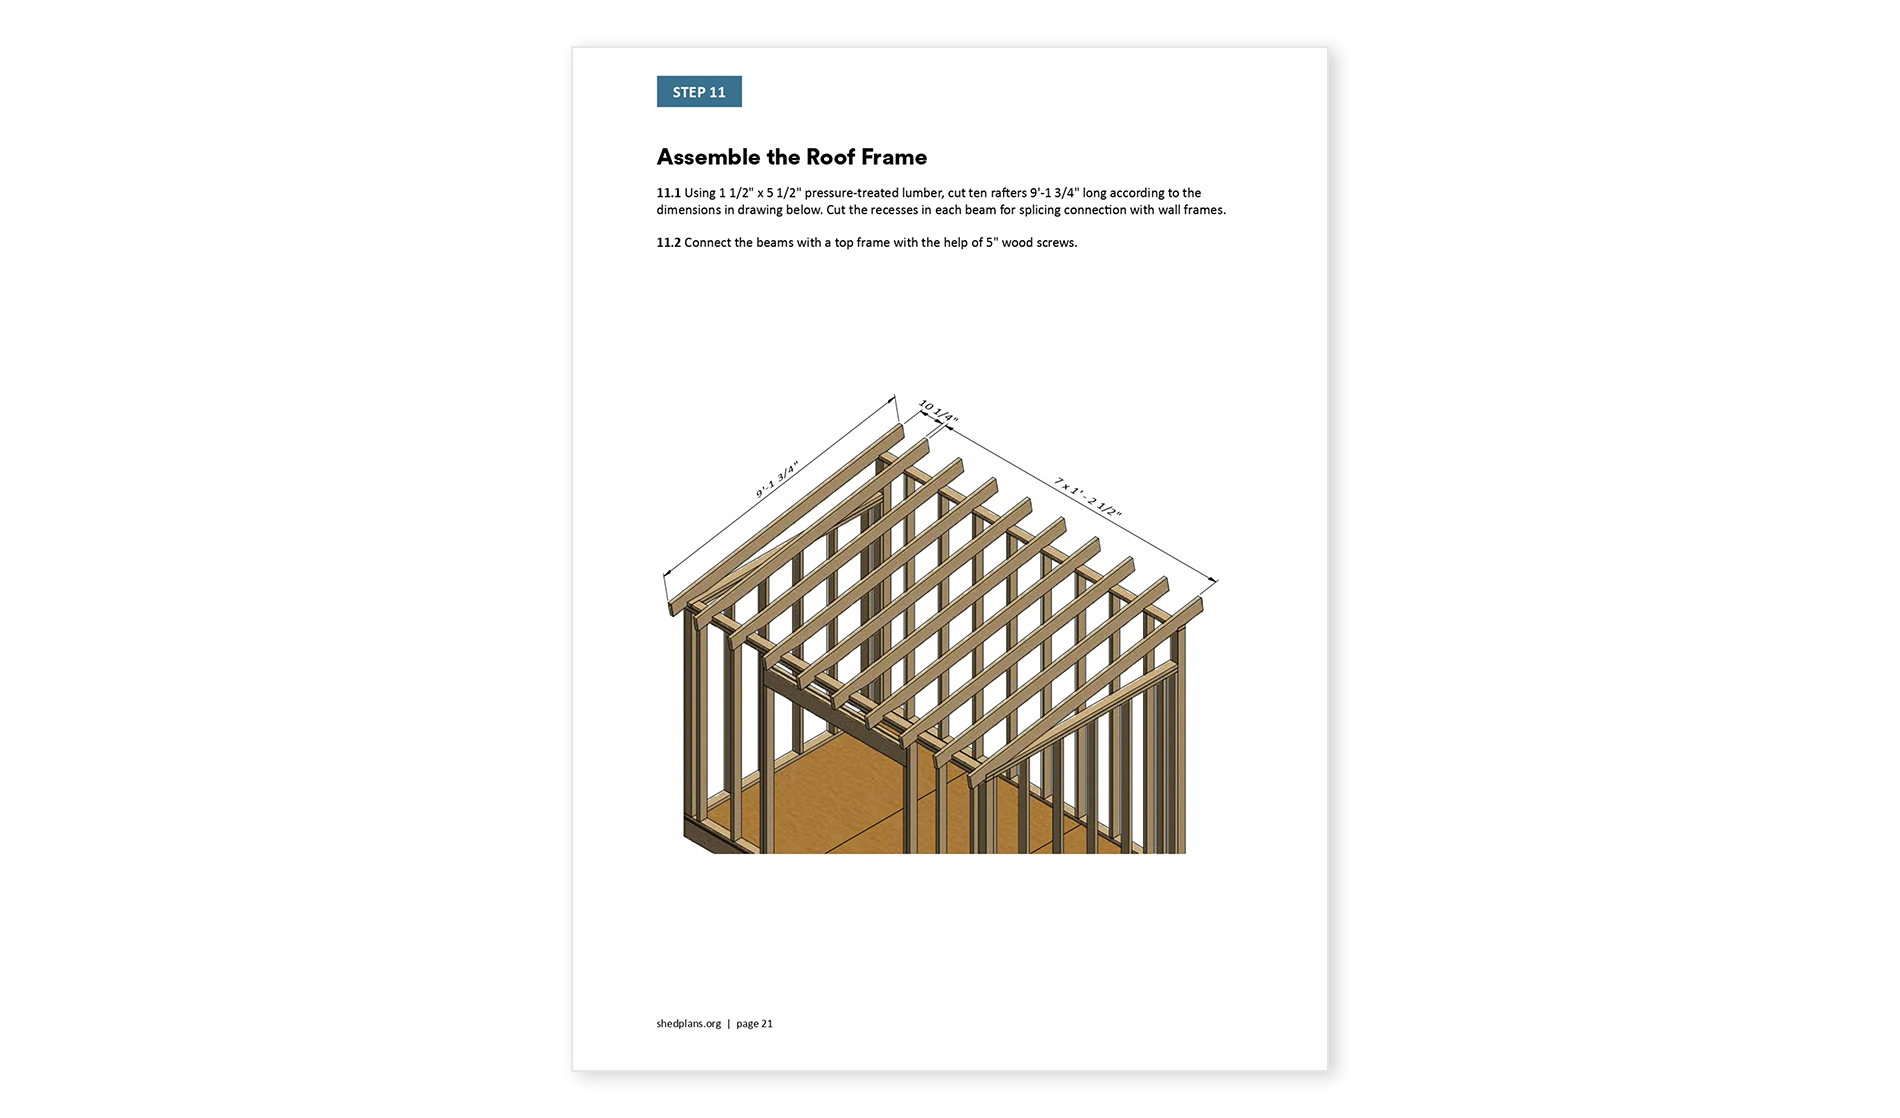
Roof Framing
The roof framing will depend on your chosen roof style. A simple lean-to roof is the easiest to construct. You'll need to attach the rafters to the top plate of your back wall and the existing structure you’re leaning the shed against. Make sure your rafters are properly spaced and secured. You'll likely need to use a suitable support structure if your lean-to is significantly long.
Roofing and Siding: Adding the Finishing Touches
With the framing complete, it’s time to add the roofing and siding. This is where your shed starts to really look like a shed!
Roofing
Install your chosen roofing material according to the manufacturer's instructions. Whether you opt for asphalt shingles, metal roofing, or another option, careful installation is crucial for a watertight roof. Don't forget to add flashing around any edges or intersections to prevent leaks.
Siding
Apply your siding (plywood, metal, or other materials). This provides weather protection and improves the shed’s aesthetic appeal. Ensure proper sealing around doors and windows to maintain a watertight seal.
Finishing Touches and Maintenance
Almost there! Add a door, windows (if applicable), and any other desired features. A final coat of exterior paint or stain will protect the wood and enhance its appearance. Regular maintenance, such as inspecting for damage and repainting or staining as needed, will extend the life of your shed.
Commonly Asked Questions
Q: Do I need a building permit?
A: It depends on your local building codes. Check with your local authority before starting construction.
Q: What type of wood should I use?
A: Pressure-treated lumber is recommended for its resistance to rot and pests.
Q: How long will it take to build?
A: The time required will vary depending on your experience and the complexity of the design. Expect it to take several days to a week or more, depending on your skills and available time.
Q: What if I'm not handy?
A: Don't worry! There are plenty of resources available, including online tutorials and videos. You can also enlist the help of a friend or family member, or even hire a contractor for assistance.
Q: How much will it cost?
A: The cost will depend on the materials you choose and your location. Expect to spend a few hundred to several thousand dollars, depending on your choices.
Remember, safety first! Always wear appropriate safety gear, such as safety glasses and work gloves. Take your time, double-check your measurements, and enjoy the process of building your own lean-to shed. Happy building!
0 comments:
Post a Comment
Note: Only a member of this blog may post a comment.